Java快速开始

APIUMC
后端知识体系开发原生移动应用
在java中UMC用java1.8标准库实现的其协议,在整个数据库访问层,全程采用UMC ORM,代码中不含任何SQL,带来更清析阅读体验。他自身只是不到200k的jar包,可以在各http宿主下运行,下面从httpserver.HttpServer本地Application宿主和Web Application Tomcat宿主和阿里云函数计算宿主方式来运行UMC。
UMC的java
Application 宿主方式
UMC包含用httpserver.HttpServer实现Application宿主启动方式,可以直接用命令行$ java UMC.Data.jar启动,如需要开发调试,只需要配置在Main class输入UMC.Web.HttpServer,下面用intelliJ IDEA来配置开发调试环境。
在intelliJ IDEA File->New->Project,直接确认
并引用 UMC.Data.jar和UMC.Activities.jar和java 数据库jdbc驱动包
新建一个Application的运行调试配置,在Main class项输入UMC.Web.HttpServer,如下图:

启动调试或运行,则会出现如下:

则UMC Application宿主方式配置成功,可以在本机浏览器输入http://localhost:5188/,就可访问了。
Web Application 宿主
在intelliJ IDEA File->New->Project,选择 Java EE下的Web Application,如下图:

并引用 UMC.Data.jar和UMC.Activities.jar和java 数据库jdbc驱动包
新建类HttpServlet并继承javax.servlet.http.HttpServlet,代码如下:
public class HttpServlet extends javax.servlet.http.HttpServlet  {
    @Override
    public void init() throws ServletException {
        super.init();
        if (!WebServlet.isScanning()) WebServlet.scanningClass(false);
    }
    @Override
    protected void doGet(HttpServletRequest req, HttpServletResponse resp) throws IOException {
        this.ProcessRequest(req, resp);
    }
    @Override
    protected void doPost(HttpServletRequest req, HttpServletResponse resp) throws IOException {
        this.ProcessRequest(req, resp);
    }
    @Override
    protected void doPut(HttpServletRequest req, HttpServletResponse resp) throws IOException {
        this.ProcessRequest(req, resp);
    }
    void ProcessRequest(HttpServletRequest req, HttpServletResponse resp) throws IOException {
        req.setCharacterEncoding("utf-8");
        resp.setCharacterEncoding("utf8");
        StringBuffer stringBuffer = req.getRequestURL();
        String query = req.getQueryString();
        if (Utility.isEmpty(query) == false) {
            stringBuffer.append("?");
            stringBuffer.append(query);
        }
        URL Url = new URL(stringBuffer.toString());//.toString());
        String ip = req.getRemoteAddr();
        String xRIP = req.getHeader("X-Real-IP");
        if (Utility.isEmpty(xRIP) == false) {
            ip = xRIP;
        }
        String chost = req.getHeader("CA-Host");
        if (Utility.isEmpty(chost) == false) {
            Url = new URL(String.format("https://%s%s%s", chost, Url.getPath(), Url.getQuery()));
        }
        new WebServlet().processRequest(new HttpContext(req, resp, ip, Url));
    }
}
再向下配置web.xml
    <servlet>
        <servlet-name>UMC</servlet-name>
        <servlet-class>UMC.Web.HttpServlet</servlet-class>
        <load-on-startup>1</load-on-startup>
    </servlet>
    <servlet-mapping>
        <servlet-name>UMC</servlet-name>
        <url-pattern>/*</url-pattern>
    </servlet-mapping>
现在关于UMC在Web Application宿主环境的配置已经完成了,现在再配置Tomcat 就可以启动运行。
阿里云函数计算宿主
此实例通过阿里云函数计算Java HTTP函数实现无服务器架构,让基于UMC的应用只要关心业务实现,不再关心服务端运维。
引用Maven库
<dependency>
      <groupId>com.aliyun.fc.runtime</groupId>
      <artifactId>fc-java-core</artifactId>
      <version>1.3.0</version>
  </dependency>
  <dependency>
      <groupId>com.aliyun.fc.runtime</groupId>
      <artifactId>fc-java-common</artifactId>
      <version>2.2.2</version>
  </dependency>
再创建UMC.Web.FCRequestHandler并实现com.aliyun.fc.runtime.HttpRequestHandler接口
代码如下:
  @Override
    public void handleRequest(HttpServletRequest request, HttpServletResponse response, Context context) throws IOException, ServletException {
        Utility.ROOTPATH = "/home/UMC/";
        String path = System.getenv("PATH");
        if (Utility.isEmpty(path) == false) {
            Utility.ROOTPATH = "/home/UMC/" + Utility.trim(path, '/') + "/";
        }
        if (WebServlet.isScanning() == false) {
            String[] pkgs = Utility.isNull(System.getenv("PACKAGE"), "UMC").split(",");
            WebServlet.scanningClass(true, pkgs);
        }
        String FC_REQUEST_PATH = (String) request.getAttribute("FC_REQUEST_PATH");
        String requestURI = (String) request.getAttribute("FC_REQUEST_URI");
        int i = requestURI.indexOf('?');
        if (i > 0) {
            FC_REQUEST_PATH += requestURI.substring(i);
        }
        URL requestUrl = new URL(new URL(request.getRequestURL().toString()), FC_REQUEST_PATH);
        String requestClientIP = (String) request.getAttribute("FC_REQUEST_CLIENT_IP");
        new WebServlet().processRequest(new FCContext(request, response, requestClientIP, requestUrl));
}其他按阿里云函数计算Java环境要求配置,并上传成功。
在各宿主配置运行成功后,并把地址在第一次浏览器打开则会如下图:
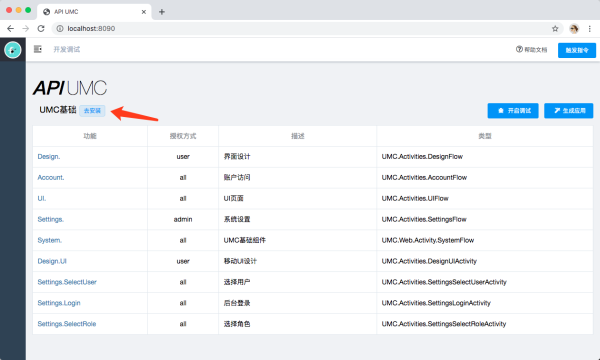
点击去安装,安装完成后,请刷新界面,默认管理账号和密码都为admin
到此恭喜你,已经完成UMC的初始化工作,
现在可以在登录在菜单管理界面进行开发调试或者生成原生APP了
整体来说,UMC核心包整个包才200K+,所以说他是一套高性能的精简Web架构,还包含了一套数据库访问机制和身份认证机制,与Spring MVC相比结构更精简,效率更高,他除去了MVC的标注路由方法和参数合成重写,所以比Spring MVC更快捷。
管理员 | 阅读(61) | 评论(0)
暂无评论